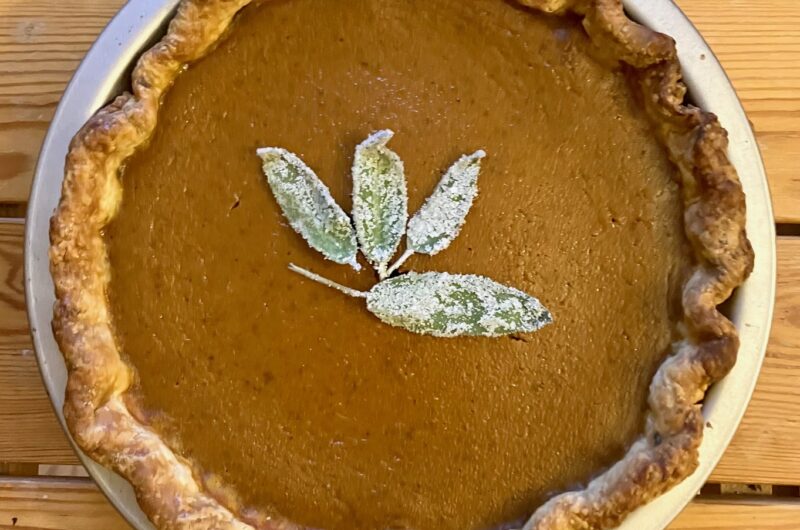
What is a Thanksgiving spread without a homemade pumpkin pie? Pumpkin pie is such a classic and nostalgic dessert, and one that I always look forward to this time of year. This brown butter sage pumpkin pie keeps many of the classic elements and spices of a pumpkin pie but adds more warmth and depth of flavor from the nuttiness of the brown butter and the subtle savory earthiness from the sage. It is, in my opinion, the perfect pumpkin pie–one where I keep wanting to go back for one last bite.
I have always loved eating pumpkin ravioli, which is nearly always served in a brown butter sage sauce. That combination of flavors is so delightful that I aimed to transform some of those classic flavors and apply them instead to a sweet pumpkin pie. The results are stunning–a silky smooth, pumpkin filling with a well-balanced blend of spices and a flaky buttery crust with flecks of sage throughout.
Too often, pumpkin pie is disappointing. The crust is often underbaked and flavorless or gluey. The filling can sometimes taste either bland or overwhelmingly of cinnamon. Since her recipes are incredibly reliable and well thought-out, I used Claire Saffitz’s caramelized honey pumpkin pie as inspiration for the base of this recipe. Instead of using canned sweetened condensed or evaporated milk, this pie gets its lusciousness from heavy cream, along with a little bit of milk. The eggs help maintain a silky texture as well. I also used a few techniques to get just the right flavor and texture:
- Parbake the crust: Baking the crust until light golden brown prior to adding in the pumpkin filling is key for avoiding the dreaded soggy bottom. This also helps ensure the pie has a sturdy base that can stand up to the weight of the filling.
- Precook the pumpkin: To get a more concentrated pumpkin flavor and more depth from the spices in the pie, my recipe calls for pre-cooking the canned pumpkin along with the spices for about 8-10 minutes. This is just enough time to cook off some of the extra water and toast the spices to help bring out their flavor.
- Infuse sage into the butter and cream: In addition to adding some minced sage to the crust, I also add it to the melted butter so the butter can pick up the extra flavor while it browns. Once the butter is browned, the cream and milk are poured into the mixture, brought to a simmer and steeped for about 10-15 minutes to allow flavors from the sage to subtly infuse into the cream. The final pie will not taste overly herbaceous or strongly of sage, but will just have a subtle savory undertone that balances the sweetness and spices.
- Watch for the jiggle: One of the most important aspects of getting the right pumpkin pie texture is knowing exactly when to take it out of the oven. If the filling is underbaked, it will not fully set but if overbaked, the texture can lose its smoothness and the pie can begin to crack in the middle. Check the pie frequently in the last few minutes of the bake. The pie is ready to take out of the oven when the filling along the edges has started to puff up some and is fully set and the center of the pie has a slight jiggle or wobble.
If you’re ready to amp-up your pumpkin pie this Thanksgiving, this brown butter sage pumpkin pie is for you. I cannot over-emphasize how delightful and well-balanced the flavor of the filling is. No matter how full you are, that filling keeps you coming back for yet another bite. And if you’re looking to turn this pie into a showstopper, you can candy some sage leaves a day or two before–it takes about five minutes or less to prepare but looks like you pulled out all the stops!
Brown Butter Pumpkin Pie with Sage
Course: Pies and tartsDifficulty: Baking session1
9-inch pie45
minutes1
hourThis brown butter sage pumpkin pie has a smooth, creamy filling with a slight nuttiness and subtle earthiness from the brown butter and sage to compliment the classic pumpkin pie spices. The spices in this pie are perfectly balanced and the crust is buttery, flaky, and crisp. Feel free to use store-bought pie dough and parbake it according to the directions below. Serve as is for Thanksgiving or another fall occasion or jazz it up with some fresh whipped cream or candied sage leaves (see note for details).
Ingredients
- For the crust
1 1/4 cups (150g) all-purpose flour
1/2 tsp salt
1 Tbsp granulated sugar
1 Tbsp sage, finely minced
8 Tbsp cold unsalted butter, cubed
3-4 Tbsp ice water
- For the filling
1 15-oz can pumpkin puree
1 1/2 tsp ground cinnamon
1/2 tsp ground ginger
1/4 tsp ground nutmeg
1/8 tsp ground cloves
A few grinds of fresh black pepper
3 large eggs
2/3 cup (140g) tightly packed light brown sugar
5 Tbsp unsalted butter
1 tsp vanilla extract
8-10 sage leaves
3/4 cup heavy cream
1/4 cup whole milk
Instructions
- Make the crust
- Prepare your ice water by adding ice to a small container of cold water and placing it back in the fridge. Add the flour, salt, and minced sage to a large mixing bowl and stir until combined. Add the cubed butter to the mixing bowl, using your hands to toss it and ensure all of the butter has been coated in flour. Then use your hands to quickly mash up the pieces of butter until the largest pieces of butter are about the size of a chickpea or slightly larger. It’s okay if the butter is of varying sizes. If at any point it feels like the butter is getting soft and a little greasy, place the mixture back in the fridge to chill before continuing.
- Add in 3 Tbsp of ice water and toss with your fingers. Gently use your fingers to break up large clumps in the dough and lightly toss it in the bowl. If the dough starts coming together, press it together into a ball. Set that aside and sprinkle just a small amount of water over the remaining dry parts left in the bowl and toss until it comes together. Add just a little bit at a time and if you’re worried about adding too much, you can even flick water from your hands into the bowl at the very end. The dough should look a bit uneven but shouldn’t have any large dry patches of visible flour. Pat into a disk, wrap with plastic wrap and refrigerate at least 3 hours or overnight.
- Set the dough out for about 5-10 minutes until it’s just warm enough to roll out. You can pound the rolling pin against the dough a few times to help make it more malleable. Then, on a lightly floured surface, roll out the dough until it’s large enough to fit in a 9″ pie plate. I find it helps prevent sticking and creates a more even circle if I frequently rotate the dough while rolling it out. Fold the rolled dough in half and transfer into the pie plate. Gently press it down into the bottom and press along the sides to ensure the crust is firmly in the pie plate. Cover with plastic wrap and refrigerate for about 5 minutes to keep the butter cold.
- Once the dough has chilled for a few minutes, trim the dough so you have about a 1/2 inch overhang. Fold the overhang underneath and press down to seal. You can then either crimp the pie by smooshing a fork down around the edge and continuing that motion all around the pie or by using your index finger on the inside of the crust, and pressing it gently between your index finger and thumb on the other side to make pleats all the way around the pie.
- Lightly prick the bottom and sides of the dough with a fork, cover with plastic wrap and chill for 30-60 minutes.
- Preheat the oven to 375F. Remove the pie crust from the fridge and line it with aluminum foil or parchment paper. Line the pie crust with aluminum foil and carefully press it down and into the creases of the pie dough where the bottom meets the sides. Lining the pie dough with foil can replace the need for pie weights. Place the pie plate onto a cookie sheet and bake for about 20 minutes. Carefully remove the parchment paper and beans (you can wrap it all up like a little sack and place it inside a heatproof pot or bowl until the the pie weights have cooled off and can be stored). Return the pie to the oven for another 5 minutes until the bottom of the crust has dried and the edges are a light golden brown. The crust can be made in advance or you can go ahead and make the filling while the crust bakes and then add the filling to the warm crust.
- Make the filling
- In a medium saucepan over medium heat add the pumpkin puree and spices. Stir occasionally and allow to cook for 8-10 minutes until the spices and pumpkin are fragrant, the mixture has darkened slightly, and some of the moisture has cooked out.
- Meanwhile, whisk together the eggs and brown sugar in a large mixing bowl, beating for about one minute until the mixture has lightened in color slightly. Once the pumpkin is ready, add that to the mixing bowl along with the vanilla extract and whisk to combine.
- In the same saucepan where you cooked the pumpkin, add 5 Tbsp of butter and melt over medium low heat. Once melted, add the sage leaves and swirl the pan regularly until the butter is a deep golden color with dark amber flecks. Once the sound of the butter cooking has quieted down, keep a close eye on it, as it will start to brown quickly after that point.
- Once the butter is browned, add in the cream and milk. Stir to combine and bring the mixture to a slight simmer. Once you see the mixture just starting to bubble and steam coming out, turn off the heat, cover, and let steep for about 10 minutes. The mixture will look unappealing here and the butter fat will float on top of the heavy cream but that’s completely fine at this stage.
- Preheat the oven to 350F. Whisking constantly, stir the mixture into the pumpkin filling until completely blended. Pour the filling into the pie shell. If you have slightly too much, you can pour a little bit into a ramekin and cook that on the side. (Note that the filling in the ramekin will cook more quickly and can be used to sample the filling without having to dig into the pie).
- Bake the pie for approximately 35-45 minutes, or until the edges are puffed up and set and the center slightly jiggles. Check the pie frequently near the end so that it doesn’t set too much and lose its jiggle before coming out of the oven. Let cool at room temperature for about 3 hours until fully cool and set. Serve the same day at room temperature, or refrigerate and serve.
Notes
- If you’d like to add candied sage leaves on top, wash the leaves and dry thoroughly. Using a pastry brush, gently brush a leaf with a thin layer of egg white on both sides, and place into a ramekin with granulated sugar. Toss the leaf in the sugar until fully coated. Then place on a parchment-lined baking sheet or plate and set out to dry overnight. Repeat with each leaf, working one at a time.




Leave a comment